Pages

Wednesday, September 22, 2010

Floral Fibers

I have decided recently to go on a Shopping Diet. Inspired by:


I have to admit. I have not finished this book yet, but so far I am finding it interesting and inspiring. It talks a lot about finding your personal style and emphasizing that it is not the cost of the clothing you wear, but the way it fits that really matters.

That being said, I have come to really notice some things that I can do to save my starving wallet. One of the main things I have realized is that a $15.00 shirt quickly becomes a $35.00 shirt when someone adds a fancy ruffle or flower to it.

So I have decided with the impending cooler weather, hopefully, heading our way, to take my winter wardrobe and give it some mini makeovers to make it better for me and really spice things up!

So here it begins: Fabric Flower Pins! I saw some pins like this at Anthropologie when I was there with my friend a few weeks ago and knew I could make them for less than what they were charging. You can make these into pins, hair clips, headbands, tote bag adornments, use them as toppers for presents, put them on your dog, whatever you want. I chose to make this first one a pin.


I started with two patterns that compliment each other nicely. I like to use one really bold print and one not so much.


Then pick a circle to trace. I used a small coffee can lid that was about four inches in diameter. This makes a flower that is about 3.5"-4" wide. The smaller the circle, the smaller the flower. I tried one that was about 2.5" in diameter later and liked the look a little better. Anyway!


Cut out circles. You can do some or a lot, I think eight is a good number.
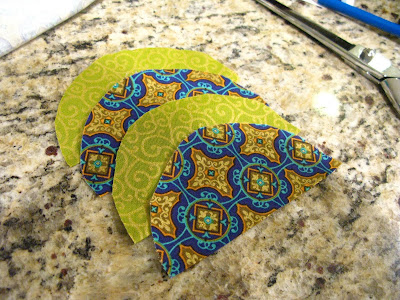

Fold them in half and cut them along the center fold.


Then fold the right sides together of the semi-circles and sew the straight side together.
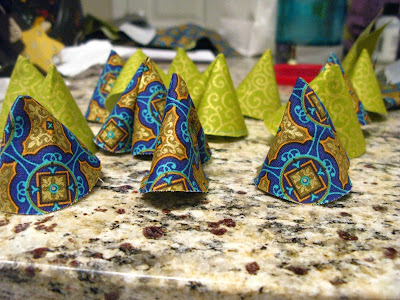

Turn them right side out. Woo gnome party!


Then use a needle and thread to sew across the open end and weave as shown.


Continue adding petals. Then sew the first added and last added together to make a circle. I made two layers, so for the bottom one I used eight petals, and then for the top layer I used four. Just make sure your top layer has at least two less than your bottom to get a "full" flower.


Then make your top layer.


Sew the two layers together. I flipped it over, and held it as shown, which helped me secure the two layers together better.


Then add your center. I made a covered button, but this can be any button or felt center, or knot or beat you like.


Flip it over. Glue a felt piece to the back to close it off. I put the pin back under this to make it neat. You can put your hair clip, headband or anything here.


Voila! These are super cute and super simple!

Wednesday, September 8, 2010

Sour Sweets!

With birthday season in full swing, my Kitchenaid is getting quite a workout! On Sunday part of my family and I celebrated my Grandmother's 87th birthday and I was able to make the cake!


I knew right away I wanted to make a lemon cake. I wanted one that was not too sweet or too heavy, like a pound cake, so I found this recipe for a Lemon Chiffon Cake with Raspberry Whipped Creme Icing.


I have never made a Lemon cake before, but this one was moderate on the scale of difficulty. Whipping egg whites is a new skill I acquired from this recipe.


Cook for a while...


They cooked PERFECTLY. I could not have asked for more beautiful cakes!


I started to make the whipped creme, but then changed my mind and decided this cake needed a raspberry butter creme.


I modified my favorite butter creme recipe to include real raspberry juice and while it turned out well, I think I need to work on this a little more.


Overall, the cake turned out great! It had a fabulous texture and was not too dry like my carrot cake! And now...


The Macaroons are coming! The Macaroons are coming!!!

Monday, September 6, 2010

Swirly Whirly

I have recently become obsessed with painting my nails regularly in an effort to let them grow out and maybe stop biting my nails! I have been reading All Lacquered Up since this obsession started. Recently she had attempted water marbling and I had to try it for myself! (I apologize in advance for my heinous fingers.)

I have now done two of these, and below are some helpful tips! I highly advise checking out some YouTube videos on this because they really are helpful.


As with any manicure, start with clean nails, and a base coat of clear. I use Sally Hansen Hard as Nails for extra strength. I also recommend a base coat of the lightest color in your manicure color selections or white. This makes it pop and if there are any tears or holes in the color, its not as noticeable. I did this on my first manicure but with You Don't Know Jacques!, a dark gray, and it was not as nice as if I had used a light color.


I also taped my nails as opposed to using oil. It is cleaner, and while not as accurate and there is still clean up needed, I think this was a lot easier to work with.


Choose two to five colors. Five may be a bit much. For this one, I chose three. OPI Dating a Royal, OPI Yodel Me on My Cell, and Essie Lapis of Luxury. I like having a mix of flat and glittery colors. I have seen this done with lots of nail polish brands, from cheap to expensive. I will be investing in some cheaper ones, but just as a side note, I feel like the OPI worked better for this than Essie. Apparently some colors are too "heavy" and fall to the bottom, or do not spread out well.


I used room temperature filtered water from my Brita as recommended, and I think it worked as it should. I made the "bulls-eye" as shown. Some people made very large ones, and only used one per nail, but I was able to do two per nail in most cases since I have tiny nails.


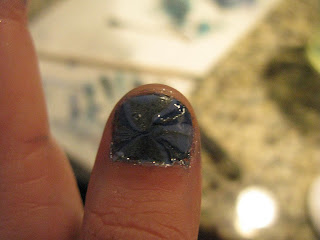
I then drug a flower pattern in the wet paint surface. This was my prettiest one, I was not going for anything specific on this manicure, but this one was extra pretty!


Then I dipped my thumb in the water and voila! Make sure you add a clear top coat to make sure this doesn't chip!

This color combination was extra pretty, and I encourage you to try it when you have some time! All in all, it took me maybe an hour. It was lots of fun too!

Thursday, September 2, 2010

CAKE!?

I promised it was coming. Here it is! My first CrafTay! attempt at cooking!

I really am not much of a kitchen chemist. I am not good at guessing amounts, I have semi-unsteady hands, making very accurate measuring impossible, and a lack of patience for all things involving cooking food in general. However, I think I just struck gold when I attempted this recipe. I will not promise that I could do this again, but I will be willing to try for special occasions. Or you can make your own...

I love the internet. I love it for lots of reasons, but one is the mass database of recipes on thousands of websites. Now weeding through the 45,000,000,000 results for "carrot cake recipe" is another story. So I turned to my favorite Food Network Celeb, Alton Brown and used his recipe for Carrot Cake found here.


I gathered the necessary ingredients. There are LOTS in this cake and icing. Hopefully your stash of cooking supplies is not as depleted as mine was and you had to go get all the spices and other baking goods. Oh well. I have an extensive supply of baking powder now so I guess I better move on and keep cooking.


The recipe calls for 6 medium carrots, I used 4 and ended up with a little more than a cup and a half finely shredded.


Mixing.


The recipe also says use a food processor. I only have a blender and my Kitchenaid. So Whisk attachment it was!


I went nutty and added some walnuts. I think it was a good move.


Whew! I poured the finished mixture into two 9" cake pans.


Bake.

While the cake was baking, I cleaned (Imagine that!) and made the icing.


I left the creme cheese out while I made the cake so it would be softened by the time I was ready for it. I substituted the butter for Crisco. Because there is nothing better for you than dairy and lard in one spoonful! (Actually, a while back in my icing adventures, I had used Crisco in an icing instead of butter and it was great.)


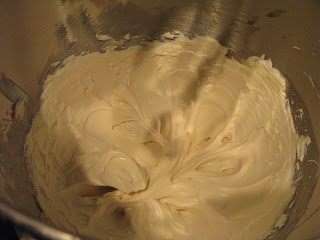
Lots of confectioners sugar and there you have it! Creme Cheese Icing!

Prep for decorating! I love to decorate cakes!


The final product! My icing was thin-ish. I should have added more sugar. Overall reviews were good flavor wise, but it was a little dry. I will attempt this again soon. I am pretty pleased with my first attempt at carrot cake!