Pages

Saturday, July 21, 2012

Business is Blooming!

About a week or so ago, I was rather sick and so I was home from work resting. Which actually means I was home from work playing on Pinterest. I found this blog post as I was pinning and I thought two things. 1. It looks more like a zinnia to me, and 2. Instead of a mirror in the center, I could finish them and make them more like a flower and hang them in my office.
Zinnias from my mom's garden.

I have a pretty big office, most importantly, it has high ceilings and to add more interest I have been trying to find something to put along the back wall that I could hang from top to bottom. So this fit the bill and my decorating scheme that I have going. 


This also means that I needed a lot of spoons because I made nine of these. I also used 11" plastic plates as my base, using the plate made the spoons fan nicely as opposed to a piece of cardboard or something flat. I found that I used 62-63 spoons on each 11" plate. Something to keep in mind if you are not making a lot of them. One thing I needed not shown in the picture above was spray paint. Rust-oleum makes a spray paint now that works on plastics!

Before I started, I added a ribbon loop to the front of the plate for hanging. Saved me frustration later.


Tiny score for breaking the spoon apart.


I started by trying to cut the spoon from the handle. Apparently I purchased the most durable spoons ever because I almost died twice trying and got a piece of plastic in my eye. I quickly changed methods and got a serrated knife and made two score marks on the back of the spoon as shown. Just putting a little score on the spoon made them easy to pop apart with my hands. There are other spoons that are probably better to cut with scissors, but mine were not. 
Crap-ton of spoons.


Once I had cut/snapped a ton of spoons I started gluing. I found it was better to put a blob on the spoon as opposed to putting a line of glue on the plate and setting them on the plate.

Then I did the first inner layer...

Another Inner Layer


And voila! The base of the flowers is complete!

I then made the other eight, two of them, I cut the plate down and made smaller versions.
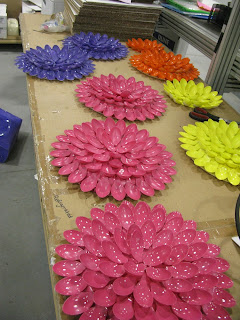
Spray Painted

Then comes the painting. I painted one by hand first without spray painting it. You can do it this way, but I think it doesn't look as nice because its hard to get all of the white of the plate painted that way, so I stopped and went to spray paint them all first.


 After that I proceeded to paint them with additional colors and blending. On each I just did what I liked and made them look more dimensional.


Once I had them all painted I made centers to finish them off. I found some golden colored cardstock, made a tube, fringed it a little, folded the fringe, added some glitter and there you have it, a pretty center! This was something simple that I made up out of the blue, you could do anything to finish it off.

Then I glued them to the centers of each flower and they were ready to hang!


They turned out just as I imagined! I may make a few more to really fill up my wall or add stems or something to them, but for now I am very excited about how they turned out!


Sunday, January 22, 2012

Never Settle!

Oh Hey! Its been a minute since my last post. A LOT has happened.

My company has moved. Therefore I did too. But not too far from my ATL home base. Just a few cities north. I also moved to a bigger place. Translate: I GOT A CRAFT ROOM. WIN. I also got a cat.

So since I moved, I also got new towels. I would like to stop and proclaim my love for Amy Butler. Dear lord. I love that stuff. Particularly her fabrics and sheet sets. So naturally my new towels were Amy towels. And naturally she had matching shower curtains.... Oh wait. There were shower curtains, but they did not match! UGH. So I looked for an alternative to match my sea foam and coral towels, but nothing made me squeal so I did the normal thing and went to Fabric.com and bought my own Amy Butler fabric and made my own shower curtain.

I have been moved into my new place for almost three months now. So naturally now that my lease is almost up, I decided to do this now. Anyway, I wanted to used two fabrics. I felt like if I was to make my own shower curtain then it should be ruffled. As everything should be.

So I chose my two fabrics based on this double sided quilted fabric. I liked them and figured they matched. So I just bought the regular, non-quilted, versions of the fabrics. I bought three yards of the floral fabric, and two of the paisley fabric.


So, as I began this endeavor, this was my design.


I then decided I was not a huge fan of the two together, so I would use just the floral and be done with it. Then I realized I did not have enough fabric to make a long enough curtain with just the floral because I bought three not four yards. Oops. So I changed my design to this! Sorry for the primitive illustrations.


Anyway, things to keep in mind when making your own shower curtain.

1.) Why?

2.) The best thing about this: No pattern necessary... Unless you have issues making a square...

3.) This requires lots of ironing. It brings out the domestic in me.

4.) Cats LOOOOVE large quantities of fabric.

KITTY! This is Milo. He is very considerate and likes to help.

Two things I made sure to do that I normally do not do. first, I made pretty seams!


Second, for the bottom ruffle, I doubled it up. I did this for two reasons. One I did not have to hem it later, and two I wanted some weight on the bottom to hold the curtain down. You know, for those breezy showers.


This was my near finished result! I took a moment to do some math and evenly distribute the button hole marks for the hangers.


Button holes are the bane of my existence. However, my mother would be proud! I finally got it together and made my one step button hole work for me. WOO!


And finally! The end result. I am crazy happy with how it looks and I am glad I did not settle for a boring store bought curtain. It is bright and fresh! Something I needed with the lovely weather we have been having recently.

Friday, November 5, 2010

Chilly Willy!

It seems that this year, Georgia decided to skip fall all together and just freeze. As the temperatures dropped this week, I decided that a certain Weenie of mine needed a new winter coat.


Meet Harry. He is probably the most hairless Harry that you've ever met. He is also very looooong. That being said, most dog jackets do not fit him very well, or they stop half way down his back. So this year, instead of trying lots of sweaters and jackets that just don't cover it, I decided to fashion a new one after one he did not mind wearing last year.


I folded the old jacket in half and used it as a pattern. If you do not have a pattern you can do what I did in the apron post and make one out of a paper bag. Since this jacket fit Harry well in the shoulders I just added four inches to the back half.


I used polar fleece, and I cut two so I could double the jacket. I put two right sides together, sewed the two together, left an opening so I could flip it right side out, then did a zigzag top stitch once right side out.


I then made two side straps to hook under his chest. I matched them up to the original jacket to make sure they would be placed right and still allow him to play.


I then used Velcro on the side straps and neck.


My machine kind of decided to lock up on me at the last second on the neck Velcro. I could fix that.... oh well.


And the final result! Both took me all of 20 minutes each and the fabric was on sale too!


I made one for Lola too but she is not nearly as pleased about this as Harry. Now that is a well dressed Weiner.

Monday, November 1, 2010

Tragedy!

Tragedy has struck the southern restaurant community. Relish, my absoulte favorite restaurant, has decided to close as of December 31st of this year. They will be reopening later next year with a Mexican restaurant. This is great and all, but we have a million Mexican restaurants in Atlanta, and Relish offered something different. True gourmet southern food.

They have many amazing menu selections ranging from fried black eyed peas, pimento cheese fritters, and shrimp and grits. However, my stand out favorite is their Krispy Kreme Bread Putting with espresso whipped creme. Knowing that these treats are now limited, I set out on a quest to make my own Krispy Kreme bread pudding.


Two things: I have never had regular bread pudding. I only know the Krispy Kreme variety. Krispy Kreme bread pudding is everything a Krispy Kreme doughnut wants to be. If you have never had one, you need to change that immediately.

On to the recipe! I used this recipe. I chose it for two reasons, the first being that it did not call for stale doughnuts. I am too impatient to wait for them to become stale. Second, the whip creme was espresso creme, as opposed to rum, and called for brewed espresso, as opposed to instant.

I know a lot of people do not have espresso machines, but when recipes call for a table spoon of instant espresso powder, I am always confused as to what the equivalent would be of brewed espresso.

This was relatively simple. I tested it and I think it turned out pretty well. Not quite Relish's yet but pretty darn close! I will be sad to see Relish go, but I am glad that not all the dishes that made it famous will be forgotten.

Sunday, October 31, 2010

Copy Cat

Recently I have been dreaming about these bracelets by Chan Luu:


However, since they seem to start at $90 and rise quickly from there, the inner jeweler in me started thinking and studying the pictures. I also Googled a tutorial for this type of bracelet, and very few photographic tutorials were available. So here is mine!

I started with a trip to Hobby Lobby. I bought round leather and flat suede. This tutorial uses the flat suede, but in reality you can use anything, even ribbon if that is what you want. Each gives a very distinctive look.

I also chose some sparkly beads. Most beads like this are sold in smaller quantities. I made the red and gold double wrap, shown below, with 54 beads and the teal and gray single wrap with 55 beads. Take bead sizing into consideration when choosing your materials. Sometimes a large bead and small leather look really nice, or a tiny bead and large leather are more interesting. They are very easy and beautiful regardless of what you choose.

I also use heavy duty thread throughout. This is important because it is one piece that holds the whole bracelet together. I think this is a flaw in the design, and I would like to find a better way to do do it so that if one thread goes, the whole bracelet is not lost. We will stick with the simple way for now though.

Decide if you want a double or single wrap, or triple even! Then fold the cord in half and wrap around your wrist the number of times you want it to wrap. I added six inches to the length of the bracelet to allow for the top knot and the bottom knots. This may be a little excessive, but it would be terrible to end your bracelet and it be too small.


Keep the cord folded in half and make a knot at the top large enough to ease a knot or button through, but not too large.


Then get A LOT of thread. I would say a yard and a half for a single, and three for a double. You want to make sure you have plenty. I secured the thread to the top knot. Secure the knot of the cord to something stable. I used a safety pin and a heavy tray. A counter is ideal.


Run the thread behind the two cord strands like so.

Place your bead on the needle then run down between the two cords.


Take the needle, and come over the top of the right cord and back through the bead. Hold the cords and the thread tight.


To add the second bead, bring the thread over the top of the left cord and back under to the right and add the second bead. Position the bead between the cords and go back over the right cord and through the bead again. Continue this process until you have your desired length. I found it is also very nice to have different colors or bead sizes to add interest to your bracelet. You can add a charm into the mix as well.


Work your way down to the end trying to keep each bead stitch even. This is a lot easier on smooth cord than a suede cord.


Complete the last stitch like usual then wrap the thread down and around the left cord, and back through the bead to the right cord. From there make a series of tiny knots right next to the last bead and trim the excess thread.


From there you can add your button, which I did not use on either, or make knots or a series of knots to make your closure.


Voila! You have a Chan Luu inspired bracelet. Each took me about two hours and the process is rather simple and very inexpensive. Good Luck!