 |
| Zinnias from my mom's garden. |
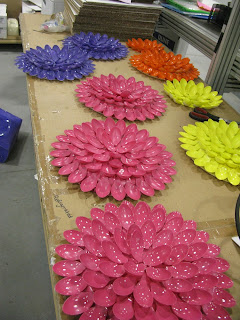
I have a pretty big office, most importantly, it has high ceilings and to add more interest I have been trying to find something to put along the back wall that I could hang from top to bottom. So this fit the bill and my decorating scheme that I have going.
This also means that I needed a lot of spoons because I made nine of these. I also used 11" plastic plates as my base, using the plate made the spoons fan nicely as opposed to a piece of cardboard or something flat. I found that I used 62-63 spoons on each 11" plate. Something to keep in mind if you are not making a lot of them. One thing I needed not shown in the picture above was spray paint. Rust-oleum makes a spray paint now that works on plastics!
Before I started, I added a ribbon loop to the front of the plate for hanging. Saved me frustration later.
 |
| Tiny score for breaking the spoon apart. |
I started by trying to cut the spoon from the handle. Apparently I purchased the most durable spoons ever because I almost died twice trying and got a piece of plastic in my eye. I quickly changed methods and got a serrated knife and made two score marks on the back of the spoon as shown. Just putting a little score on the spoon made them easy to pop apart with my hands. There are other spoons that are probably better to cut with scissors, but mine were not.
 |
| Crap-ton of spoons. |
Once I had cut/snapped a ton of spoons I started gluing. I found it was better to put a blob on the spoon as opposed to putting a line of glue on the plate and setting them on the plate.
Then I did the first inner layer...
 |
| Another Inner Layer |
And voila! The base of the flowers is complete!
I then made the other eight, two of them, I cut the plate down and made smaller versions.
 |
| Spray Painted |
Then comes the painting. I painted one by hand first without spray painting it. You can do it this way, but I think it doesn't look as nice because its hard to get all of the white of the plate painted that way, so I stopped and went to spray paint them all first.
After that I proceeded to paint them with additional colors and blending. On each I just did what I liked and made them look more dimensional.
Once I had them all painted I made centers to finish them off. I found some golden colored cardstock, made a tube, fringed it a little, folded the fringe, added some glitter and there you have it, a pretty center! This was something simple that I made up out of the blue, you could do anything to finish it off.
Then I glued them to the centers of each flower and they were ready to hang!
 They turned out just as I imagined! I may make a few more to really fill up my wall or add stems or something to them, but for now I am very excited about how they turned out!


This comment has been removed by the author.
ReplyDeleteHow many spoons did you use to make your big one how many spoons was it did you us
ReplyDeleteGoing to try this
ReplyDeleteGreat Joni love it
ReplyDeleteI love this 😀 craft! It makes me 😃 smile! WE ALL NEED A SMILE,THESE DAYS,smh TFS
ReplyDeleteShe said 62 or 63 spools on 11 inch plate
ReplyDeleteOk wear safety glasses buy them at dollar tree also buy spoons for dollar tree but think her's are more so heavy ones got them spoons at dollar general
Plates look like more stronger ones too as for plate i spray paint before let dry good the plates!! Great idea yes cute too.
I would put glitter more so in middle holographic glitter in 2 oz bottle brush it on and a glass gem in middle any color you want !! Wear safety glasses it a must. Could use also sheet medal cutters or wirer cutter !! Thank you ..I do some test. See with is better me !! Love idea yes !!
Those are so cute, seen them before but forgot about them. Wonderful idea to fill up a wall. I think I will try some small ones for my hallway with the great grand kids pictures. lol
ReplyDeleteAre these sturdy nough to go outside
ReplyDeleteThis is really cute. I think I'm going to try this out. Thank you for the directions on making them.
ReplyDeleteThanks for posting this info. I just want to let you know that I just check out your site and I find it very interesting and informative. I can't wait to read lots of your posts. Business
ReplyDeleteThank you❤
ReplyDeleteI think this is an informative post and it is very useful and knowledgeable. therefore, I would like to thank you for the efforts you have made in writing this article. Abu Dhabi Company Formation
ReplyDeleteNice knowledge gaining article. This post is really the best on this valuable topic. Abu Dhabi Company Formation
ReplyDeleteLove these will they stand up to weather?
ReplyDelete