I have to admit. I have not finished this book yet, but so far I am finding it interesting and inspiring. It talks a lot about finding your personal style and emphasizing that it is not the cost of the clothing you wear, but the way it fits that really matters.
That being said, I have come to really notice some things that I can do to save my starving wallet. One of the main things I have realized is that a $15.00 shirt quickly becomes a $35.00 shirt when someone adds a fancy ruffle or flower to it.
So I have decided with the impending cooler weather, hopefully, heading our way, to take my winter wardrobe and give it some mini makeovers to make it better for me and really spice things up!
So here it begins: Fabric Flower Pins! I saw some pins like this at Anthropologie when I was there with my friend a few weeks ago and knew I could make them for less than what they were charging. You can make these into pins, hair clips, headbands, tote bag adornments, use them as toppers for presents, put them on your dog, whatever you want. I chose to make this first one a pin.

I started with two patterns that compliment each other nicely. I like to use one really bold print and one not so much.

Then pick a circle to trace. I used a small coffee can lid that was about four inches in diameter. This makes a flower that is about 3.5"-4" wide. The smaller the circle, the smaller the flower. I tried one that was about 2.5" in diameter later and liked the look a little better. Anyway!

Cut out circles. You can do some or a lot, I think eight is a good number.

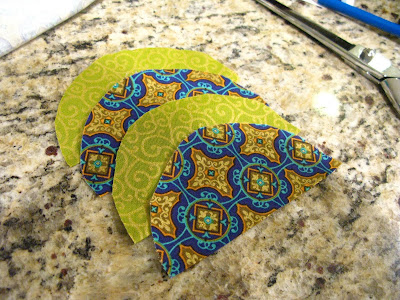
Fold them in half and cut them along the center fold.

Then fold the right sides together of the semi-circles and sew the straight side together.

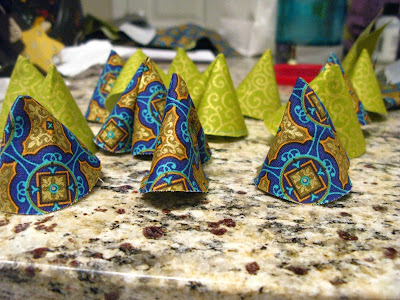
Turn them right side out. Woo gnome party!

Then use a needle and thread to sew across the open end and weave as shown.


Continue adding petals. Then sew the first added and last added together to make a circle. I made two layers, so for the bottom one I used eight petals, and then for the top layer I used four. Just make sure your top layer has at least two less than your bottom to get a "full" flower.

Then make your top layer.


Sew the two layers together. I flipped it over, and held it as shown, which helped me secure the two layers together better.

Then add your center. I made a covered button, but this can be any button or felt center, or knot or beat you like.

Flip it over. Glue a felt piece to the back to close it off. I put the pin back under this to make it neat. You can put your hair clip, headband or anything here.

Voila! These are super cute and super simple!
I really like the fabric flowers! You make it look so easy. I do bet they are a bit time consuming though....I just might have to try it once my poor thumb heals up :o)
ReplyDelete1) making circle. you can fold fabric twice..and do a 1/4 circle pattern easy. Dont even need a pattern. But great idea for consistency.
ReplyDelete2) Tulle circles are circles..and might be great for 1/2 of the design.
3) Might make top layer smaller.
4) You are a crafty one ...and I love it!