Pages

Friday, November 5, 2010

Chilly Willy!

It seems that this year, Georgia decided to skip fall all together and just freeze. As the temperatures dropped this week, I decided that a certain Weenie of mine needed a new winter coat.


Meet Harry. He is probably the most hairless Harry that you've ever met. He is also very looooong. That being said, most dog jackets do not fit him very well, or they stop half way down his back. So this year, instead of trying lots of sweaters and jackets that just don't cover it, I decided to fashion a new one after one he did not mind wearing last year.


I folded the old jacket in half and used it as a pattern. If you do not have a pattern you can do what I did in the apron post and make one out of a paper bag. Since this jacket fit Harry well in the shoulders I just added four inches to the back half.


I used polar fleece, and I cut two so I could double the jacket. I put two right sides together, sewed the two together, left an opening so I could flip it right side out, then did a zigzag top stitch once right side out.


I then made two side straps to hook under his chest. I matched them up to the original jacket to make sure they would be placed right and still allow him to play.


I then used Velcro on the side straps and neck.


My machine kind of decided to lock up on me at the last second on the neck Velcro. I could fix that.... oh well.


And the final result! Both took me all of 20 minutes each and the fabric was on sale too!


I made one for Lola too but she is not nearly as pleased about this as Harry. Now that is a well dressed Weiner.

Monday, November 1, 2010

Tragedy!

Tragedy has struck the southern restaurant community. Relish, my absoulte favorite restaurant, has decided to close as of December 31st of this year. They will be reopening later next year with a Mexican restaurant. This is great and all, but we have a million Mexican restaurants in Atlanta, and Relish offered something different. True gourmet southern food.

They have many amazing menu selections ranging from fried black eyed peas, pimento cheese fritters, and shrimp and grits. However, my stand out favorite is their Krispy Kreme Bread Putting with espresso whipped creme. Knowing that these treats are now limited, I set out on a quest to make my own Krispy Kreme bread pudding.


Two things: I have never had regular bread pudding. I only know the Krispy Kreme variety. Krispy Kreme bread pudding is everything a Krispy Kreme doughnut wants to be. If you have never had one, you need to change that immediately.

On to the recipe! I used this recipe. I chose it for two reasons, the first being that it did not call for stale doughnuts. I am too impatient to wait for them to become stale. Second, the whip creme was espresso creme, as opposed to rum, and called for brewed espresso, as opposed to instant.

I know a lot of people do not have espresso machines, but when recipes call for a table spoon of instant espresso powder, I am always confused as to what the equivalent would be of brewed espresso.

This was relatively simple. I tested it and I think it turned out pretty well. Not quite Relish's yet but pretty darn close! I will be sad to see Relish go, but I am glad that not all the dishes that made it famous will be forgotten.

Sunday, October 31, 2010

Copy Cat

Recently I have been dreaming about these bracelets by Chan Luu:


However, since they seem to start at $90 and rise quickly from there, the inner jeweler in me started thinking and studying the pictures. I also Googled a tutorial for this type of bracelet, and very few photographic tutorials were available. So here is mine!

I started with a trip to Hobby Lobby. I bought round leather and flat suede. This tutorial uses the flat suede, but in reality you can use anything, even ribbon if that is what you want. Each gives a very distinctive look.

I also chose some sparkly beads. Most beads like this are sold in smaller quantities. I made the red and gold double wrap, shown below, with 54 beads and the teal and gray single wrap with 55 beads. Take bead sizing into consideration when choosing your materials. Sometimes a large bead and small leather look really nice, or a tiny bead and large leather are more interesting. They are very easy and beautiful regardless of what you choose.

I also use heavy duty thread throughout. This is important because it is one piece that holds the whole bracelet together. I think this is a flaw in the design, and I would like to find a better way to do do it so that if one thread goes, the whole bracelet is not lost. We will stick with the simple way for now though.

Decide if you want a double or single wrap, or triple even! Then fold the cord in half and wrap around your wrist the number of times you want it to wrap. I added six inches to the length of the bracelet to allow for the top knot and the bottom knots. This may be a little excessive, but it would be terrible to end your bracelet and it be too small.


Keep the cord folded in half and make a knot at the top large enough to ease a knot or button through, but not too large.


Then get A LOT of thread. I would say a yard and a half for a single, and three for a double. You want to make sure you have plenty. I secured the thread to the top knot. Secure the knot of the cord to something stable. I used a safety pin and a heavy tray. A counter is ideal.


Run the thread behind the two cord strands like so.

Place your bead on the needle then run down between the two cords.


Take the needle, and come over the top of the right cord and back through the bead. Hold the cords and the thread tight.


To add the second bead, bring the thread over the top of the left cord and back under to the right and add the second bead. Position the bead between the cords and go back over the right cord and through the bead again. Continue this process until you have your desired length. I found it is also very nice to have different colors or bead sizes to add interest to your bracelet. You can add a charm into the mix as well.


Work your way down to the end trying to keep each bead stitch even. This is a lot easier on smooth cord than a suede cord.


Complete the last stitch like usual then wrap the thread down and around the left cord, and back through the bead to the right cord. From there make a series of tiny knots right next to the last bead and trim the excess thread.


From there you can add your button, which I did not use on either, or make knots or a series of knots to make your closure.


Voila! You have a Chan Luu inspired bracelet. Each took me about two hours and the process is rather simple and very inexpensive. Good Luck!


Saturday, October 16, 2010

Dreamy Biscuits


This morning I decided I wanted to make some biscuits. Normally I turn towards mixes and pre made biscuits. Today was different. I set off to make the Flying Biscuit's famous biscuits, but found out I did not have quite the right ingredients and opted for another recipe where I had most of the ingredients. I found this recipe from my favorite, Alton Brown. I did not have buttermilk, so I substituted for heavy creme that I did have, just because I was too lazy to go to the grocery store.


The recipe is extremely easy and quick. Even with the lazy substitute, they turned out light and fluffy. Well worth my 30 minutes this morning. I will be trying them with buttermilk soon!

Wednesday, October 13, 2010

Sweet Apples

Last night I got into the fall spirit, despite the lack of fall weather, and made caramel apples! I used Gala apples and just regular caramel chunks and two table spoons of water and they turned out wonderfully!


Another great use for Silpat. They came right off!


I must apologize for the extreme delay in posting, I have been doing LOTS of Craftay things, but they are not quick projects. You can expect a lot over the next few weeks due to one of my favorite spooky holidays!

Wednesday, September 22, 2010

Floral Fibers

I have decided recently to go on a Shopping Diet. Inspired by:


I have to admit. I have not finished this book yet, but so far I am finding it interesting and inspiring. It talks a lot about finding your personal style and emphasizing that it is not the cost of the clothing you wear, but the way it fits that really matters.

That being said, I have come to really notice some things that I can do to save my starving wallet. One of the main things I have realized is that a $15.00 shirt quickly becomes a $35.00 shirt when someone adds a fancy ruffle or flower to it.

So I have decided with the impending cooler weather, hopefully, heading our way, to take my winter wardrobe and give it some mini makeovers to make it better for me and really spice things up!

So here it begins: Fabric Flower Pins! I saw some pins like this at Anthropologie when I was there with my friend a few weeks ago and knew I could make them for less than what they were charging. You can make these into pins, hair clips, headbands, tote bag adornments, use them as toppers for presents, put them on your dog, whatever you want. I chose to make this first one a pin.


I started with two patterns that compliment each other nicely. I like to use one really bold print and one not so much.


Then pick a circle to trace. I used a small coffee can lid that was about four inches in diameter. This makes a flower that is about 3.5"-4" wide. The smaller the circle, the smaller the flower. I tried one that was about 2.5" in diameter later and liked the look a little better. Anyway!


Cut out circles. You can do some or a lot, I think eight is a good number.


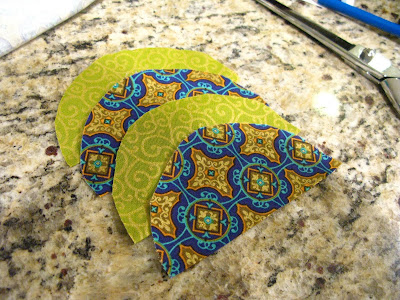
Fold them in half and cut them along the center fold.


Then fold the right sides together of the semi-circles and sew the straight side together.


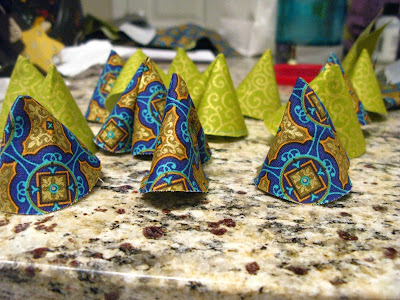
Turn them right side out. Woo gnome party!


Then use a needle and thread to sew across the open end and weave as shown.


Continue adding petals. Then sew the first added and last added together to make a circle. I made two layers, so for the bottom one I used eight petals, and then for the top layer I used four. Just make sure your top layer has at least two less than your bottom to get a "full" flower.


Then make your top layer.


Sew the two layers together. I flipped it over, and held it as shown, which helped me secure the two layers together better.


Then add your center. I made a covered button, but this can be any button or felt center, or knot or beat you like.


Flip it over. Glue a felt piece to the back to close it off. I put the pin back under this to make it neat. You can put your hair clip, headband or anything here.


Voila! These are super cute and super simple!